Go live: building agent application with Langchain+Chainlit+Fly

In my previous tutorial, I explained how I used ChatGPT function calling to build a conversational agent which can access my Notion database. It is handy to me already: I am using it to sort out my notes and remind of my ideas. But it is rather tedious to use it in a Jupyter notebook. In this article, I will show how to quickly build and deploy online a chatbot web application using Langchain, Chainlit, and Fly.io.
Project setup
First of all, this example requires some structure: it is no longer a one-time script you can run in Jupyter Notebook; it is a real application. To quickly set up a Python application project, I recommend using Poetry, an end-to-end tool to manage your Python project configuration. Setup a boilerplate project with:
poetry new notion-assistant
This interactive Shell flow will ask questions about your project configuration and its dependencies. We need langchain, langchain-openai, chainlit, notion-client.
Note that to run your Python code in the context of the Poetry’s virtual environment with your dependencies, you need to run it with poetry run, like this:
poetry run src/myapp.py
Poetry is optional; you can use any other tool. poetry is my preference, and I am going to use it in the following examples.
Additionally, you can simplify loading environment variables, like API tokens. Setup yourself an .env file like this:
OPENAI_API_KEY=<your-key>
NOTION_API_KEY=<your-key>
It will be automatically loaded in chainlit application. You can also integrate it with poetry: add a plugin poetry self add poetry-dotenv-plugin.
Agent
Now, lets implment our agent using LangChain. LangChain is a relatively new and rapidly developed framework. Just recently a version 0.1.0 was released, so its API is rather unstable. But it already offers a lot of benefits for a GenAI practicioner: unified interface for various use-cases, tools for knowledge retrieval and function execution, ecosystem for production execution (LangSmith, LangServe).
Lets start with implementing an agent chain:
from langchain.agents import AgentExecutor, create_openai_tools_agent
from langchain_core.prompts import ChatPromptTemplate, MessagesPlaceholder
from langchain_core.runnables import Runnable
from langchain_openai.chat_models import ChatOpenAI

tools: list = []
llm = ChatOpenAI(temperature=0.1, streaming=True, model="gpt-4-0125-preview")
assistant_system_message = """
You are a helpful agent which helps a user to manage his Notion API.

Greet the user in the first message. Answer in Ukrainian.
"""
prompt = ChatPromptTemplate.from_messages(
    [
        ("system", assistant_system_message),
        MessagesPlaceholder(variable_name="messages"),
        MessagesPlaceholder(variable_name="agent_scratchpad"),
    ]
)

agent: Runnable = create_openai_tools_agent(llm, tools, prompt)
agent_executor = AgentExecutor(agent=agent, tools=tools, verbose=True)  # type: ignore
We continue using ChatGPT under the hood. It is the best model to my experience, and gpt-4-0125-preview is latest version, which is currently ranked 3rd at the chatbot arena leaderboard. Practically, with LangChain you can easily swap one model with another, so you can choose any language model to your preference.
Below the model, we define the model prompt: a template interface which will be used to process input messages before sending them to the model. It starts with a system prompt, which is followed with placeholders for messages and agent_scratchpad. I will explain later how those are used.
The final piece is a definition of an agent chain and its executor. In LangChain, chain is a basic element of execution, a language processing pipeline. It is like a platform for various lego blocks, which keep them all together. It can already be used to call a model, but to also execute tools in conversation flow, we need to wrap it up into AgentExecutor.
Tools
Now, the part which is missing is tools: custom functions which will interact with Notion.
from langchain_core.pydantic_v1 import BaseModel, Field
from langchain_core.tools import tool
from notion_client import Client

notion_client = Client(auth=os.environ["NOTION_API_KEY"])

class SearchMyNotionInput(BaseModel):
    """Input for the Notion search tool."""

    query: str = Field(description="Search query to look up")
    sort_last_editing_time: bool = Field(description="Show the most recently edited documents first.", default=True)
    start_cursor: str | None = Field(
        description="A cursor value returned in a previous response that If supplied, limits the response to results "
        "starting after the cursor. If not supplied, then the first page of results is returned. "
    )
    page_size: int = Field(description="The number of documents to return", max=100, default=10)

@tool(args_schema=SearchMyNotionInput)
def search_my_notion(
    query: str, sort_last_editing_time: bool = True, page_size: int = 10, start_cursor: str | None = None
) -> dict:
    """Search over documents in Notion workspace.
    If the user is asking to search something in his notes, you can use this tool.
    If an error occurs, show to user all debug information.
    """
    return notion_client.search(
        query=query,
        sort={
            "direction": "descending" if sort_last_editing_time else "ascending",
            "timestamp": "last_edited_time",
        },
        start_cursor=start_cursor,
        page_size=page_size,
    )

class GetNotionPageContentInput(BaseModel):
    """Notion page id input."""

    page_id: str = Field(description="Page id to get content from.")
    start_cursor: str | None = Field(
        description="If supplied, this endpoint will return a page of results starting after the cursor provided. "
        "If not supplied, this endpoint will return the first page of results."
    )

@tool(args_schema=GetNotionPageContentInput)
def get_notion_page_content(page_id: str, start_cursor: str | None = None) -> dict:
    """Get a page content in Notion workspace.
    If the user is asking to get some content from his notes, you can use this tool.
    If an error occurs, show to user all debug information."""
    return notion_client.blocks.children.list(page_id, start_cursor=start_cursor, page_size=10)

tools = [search_my_notion, get_notion_page_content]
LangChain provide several options how to define tools. I prefer decorating functions with @tool. This converts a function into a tool definition, inferring its decsription from a docstring. The only thing which is not possible to infer from the Python function is additional information about its arguments, like their description or limitations of their values. To handle that, LangChain allows using Pydantic models, which can be separately passed into a tool as an arguments schema. This is quite helpful: you can use field descriptions to instruct the language model how to apply those arguments.
Serve with Chainlit
The agent definition is ready. But there is yet no interface to interact with it. In the previous tutorial I used Juputer Notebook and input() in a loop to simulate a chat interface. Chainlit can provide a better experience: it is a web-framework specially tailored to serving chat bots. It is a “batteries included” tool for conversational agents: out of the box it allows to build a rich chat application with your agent driving it. Lets set it up!
import chainlit as cl
from langchain_core.messages import AIMessage, HumanMessage
from langchain_core.runnables import Runnable, RunnableConfig

@cl.on_chat_start
async def on_chat_start():
    cl.user_session.set("agent", agent_executor)
    cl.user_session.set("messages", [])

@cl.on_message
async def on_message(input: cl.Message):
    agent: Runnable = cl.user_session.get("agent")
    messages: list = cl.user_session.get("messages")
    messages.append(HumanMessage(content=input.content))

    response = cl.Message(content="")
    ai_message_str = ""

    async for event in agent.astream_events(
        {"messages": messages},
        version="v1",
        config=RunnableConfig(callbacks=[cl.LangchainCallbackHandler()]),
    ):
        kind = event["event"]
        if kind == "on_chat_model_stream":
            content = event["data"]["chunk"].content
            await response.stream_token(content)
            ai_message_str += content

    await response.send()
    messages.append(AIMessage(content=ai_message_str))
With chainlit you don’t need to define HTTP or WebSockets routes. You simply need to plug-in your conversational agent into its callbacks:
on_chat_startis executed when a new conversation started. In it we store in session the agent definition and initialize the messages historyon_messageis executed on every new message from a user
Most importantly, it sets an async interaction with the web client, which allows us to see the agent writing a message in real time. For that we use interface astream_events and subscribe to on_chat_model_stream to get model output.
As an argument astream_events accepts variables we have defined in the prompt: messages which is the chat history.
Lets run the chat bot application now:
> chainlit run src/app.py -w
2024-03-30 07:02:26 - Loaded .env file
2024-03-30 07:02:27 - Your app is available at http://localhost:8000
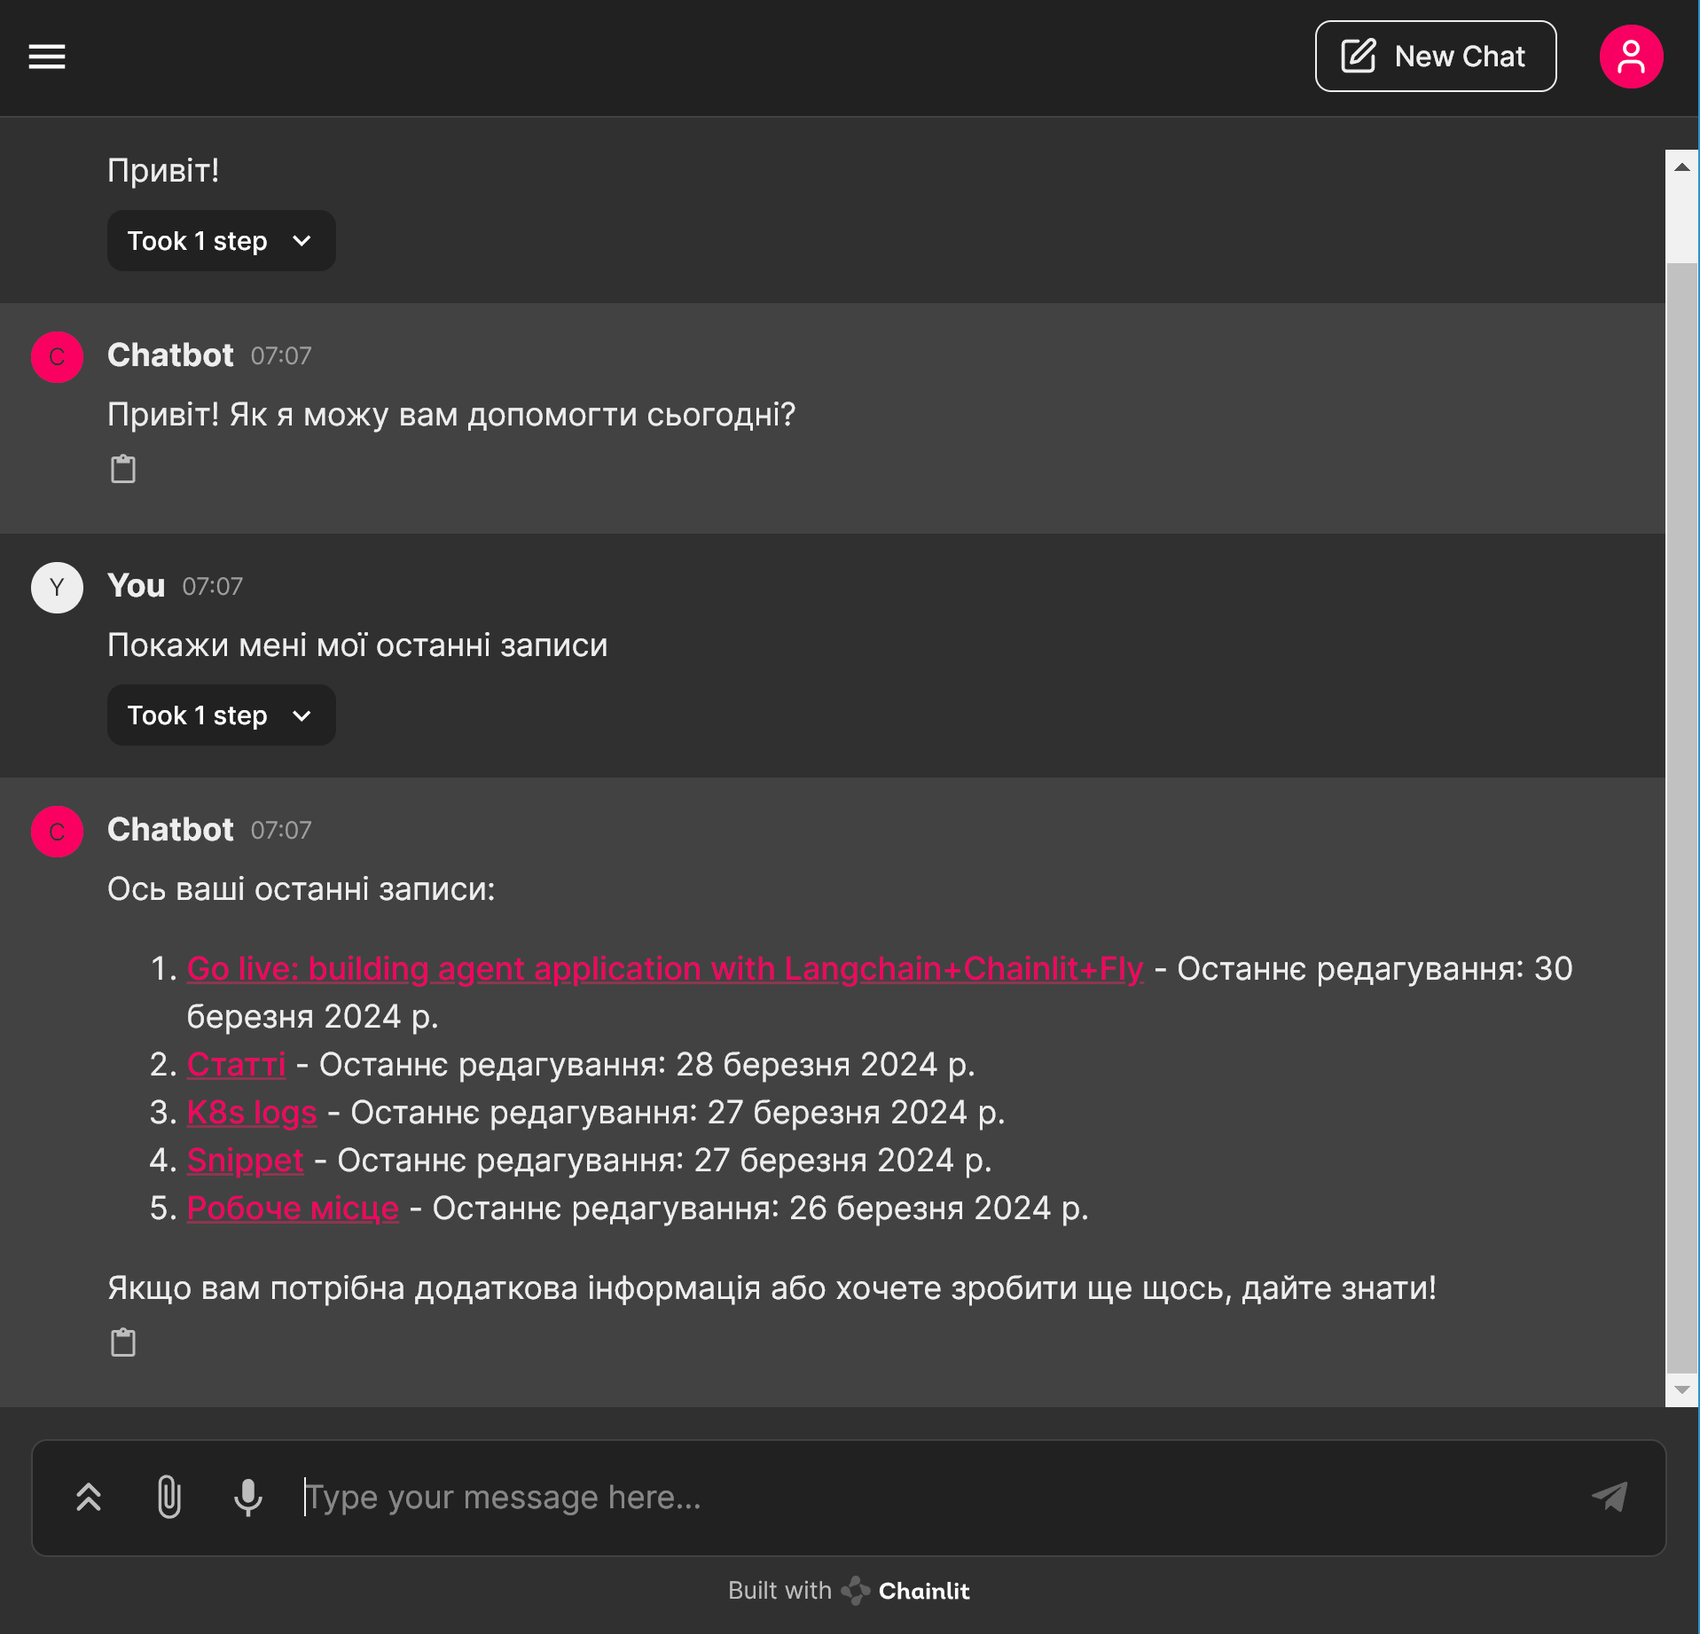
If you visit localhost:8000, you will see your chat bot application and can start a conversation in it:
Deploy with Fly.io
The application is ready to be used. But its only available locally on your machine. To have access anywhere, you can deploy it with Fly.io. It is a simple and handy Platform-as-a-Service tool, which does not require much expertise to use, so I use it for my hobby projects.
🗒️ Fly.io is a paid service: the basic plan starts with 5$/month.
You can learn how to set up your app in Fly here. It provides flyctl: a CLI to setup and deploy your application. But first we need to define a Dockerfile for the container. Use this example as a reference:
FROM python:3.11-alpine

# Create folder
RUN mkdir /app
WORKDIR /app

# Install poetry
RUN pip install poetry==1.8.2

# Install project dependencies
COPY poetry.lock pyproject.toml ./
RUN poetry install --no-root --no-cache --no-dev

# Copy project files
COPY . .
RUN poetry install --no-dev

# Run the application
ENTRYPOINT poetry run chainlit run src/app.py
You can build and run this container in Docker to test it:
docker build -t nt-assistant .
docker run -e OPENAI_API_KEY=<your-key> -e NOTION_API_KEY=<your-key> -p 8000:8000  nt-assistant
It is optional: you can just do fly launch to configure, package and deploy your application on cloud. It will ask you a few questions about your configuration: make sure to configure your application port to 8000 which is the default port for chainlit.
In just a couple of moments you application will be online and you can start using it wherever you like: on your phone or share with your friends.
Final words
It is very basic example, and you most likely you would want to extend it. Check documentation for Chainlit and LangChain, there is a lot of amazing features there.
🛑 CAUTION! By default your application is public! If you deploy it as is, anyone can chat with your bot, and access your notion data. To prevent that, you can implement simple password authentication or any other authentication preference.
In my repository NotoMate you can find a real project I have used as a reference.
I hope this tutorial is helpful and your AI experiment is succesful. Let me know if you think it can be improved, and write in comments what other topics are interesting to you!
Language models are a powerful tool, but one task they will not handle is defending Ukraine from Russian aggression. Ukrainian Armed Forces can handle that, and we are helping UAF to handle that.
Recently, I did a practical engineering course People Drones and started building military grade FPV drones myself. You can subsribe and support me at BuyMeACoffee or (if you are in Ukraine) donate directly to my monobanka. Slava Ukraini!